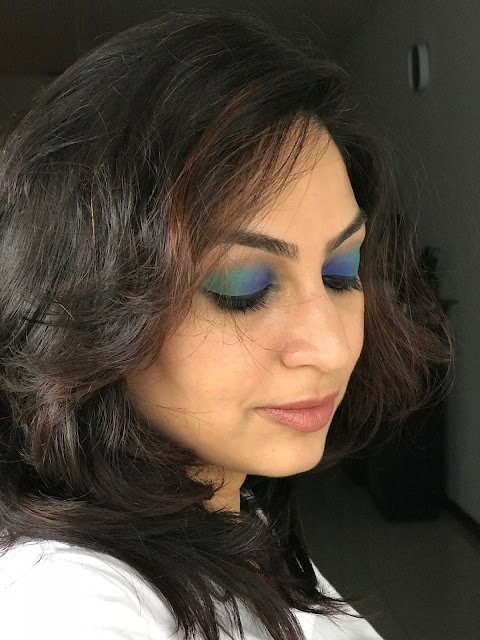
Tutorial: Emerald Green & Royal Blue Color Eye Makeup
Hi people,
The look that I have created in this video is a mix of royal blue & emerald green. They are super bright & intense colours to play with and can be paired with this embroidered outfit for added glam. Here's how it looks.
And of course, here's the entire video where you can see it all step by step.
The look that I have created in this video is a mix of royal blue & emerald green. They are super bright & intense colours to play with and can be paired with this embroidered outfit for added glam. Here's how it looks.
I start off with applying primer on the eyes. I absolutely need a primer for a solid base and to avoid creasing later.
I then bring in the royal blue in a matte finish. I just take a good amount of product on the brush and start applying from the inner corner of the eye towards the center. I want a high colour intensity so I keep adding more product on the brush.
This blue will transition to green from the center hence I make sure that I bring the product all the way up to that point.
My next colour is the emerald green. I start working with it from the outer corners of the eye and sweep it towards the blue. You can always play with textures in looks such as these .... like the blue I used was a matte and the green is slightly frosted.
Ensure that the colour transitions are smooth.
After this, I dab some brown on the brush to crease the look out. The crease just outlines the colours and lends more definition.
I then highlight my brow bones with a light champagne colour.
For the inner corners of the eyes, I take a tiny bit of gold and dab off near the tear ducts.
I am going to line my eyes with a black liner & follow up with kajal on the water line. I’m going for a simple eyeliner look but if your application skills are good, you can experiment with different styles.
I want to intensify the look so I sweep some dark navy blue under the waterline - just below the kajal.
I apply lots of mascara to open up the eyes.
My complexion for this look is basic. I have primed my face and then dabbed the foundation evenly across. For the contouring, I sweep some bronzer on the natural contour lines of my face & blend everything out.
For the lips I am going in a base of bright pink in matte. Incase of mattes, ensure that your lips are well hydrated before hand. As you can see in the video, the lip colour is quite bright so I subdue the pink matte with a very nude champagne colour.
Lastly I set the look with a loose translucent powder.
I always say this that you can achieve any look with any brands of your choice - drugstore / high end, that doesn’t matter.
However the ones I have used are -
On the eyes:
Eye Primer - Urban Decay Eye Primer Potion
Eye Shadows – Royal Blue By Make Up Revolution’s Salvation Palatte
& Emerald Green by Sephora
Eyeliner & Kajal/ Kohl by Chambor
Under waterline Navy Blue – Sephora
It's Real Mascara by Benefit Cosmetics
On the Face:
Yellow Radiant Primer by Make Up Forever
MAC Studio Fix in NC25
Its Real Mascara by Benefit Cosmetics
Sculpting by contour kit by Make Up Forever
Lipstick:
Peach Me in #08 by Faces Canada
So Seoul in #08 Velourlips by Australis Cosmetics


Sach me kitni mehnat ki hai aapne aur uska itna accha result bhi aaya 👌👌 perfect peacock colour dikh raha hai
ReplyDelete